This link goes to the SU Animate path animation page and describes all the other features that have been retained in SU Animate 4. Keep in mind the user interface has changed but the way path animations, spiral animations, time-lapse animations, SU Grid is essentially the same
SU Animate V4 - What's New Summary
User Interface Changes
Single Animation dialog box that presents all animations in the model.
Animation Player dialog to play animations.
Player dialog lets you play, pause, step, loop and control the speed of animations.
Player dialog offers the same control when playing Google SketchUp animations, i.e. "scenes".
Ability to edit common animation properties (name, frame count, delay count, repeat option) from the dialog.
Ability to select the objects for an animation directly rather than only by name.
Key Frame Animations
Ability to create key-frame animations for object or camera motion
Key-frame animations can handle visibility by layer, allowing construction design simulation.
Path animation options - to move objects without rotating, Add/ Remove groups easily.
When editing polyline control points, the points stay in their original plane by default.
Ability to create table-driven animations that access external sources of data.
Tools to generate names for groups and component instances, and to distribute them onto layers.
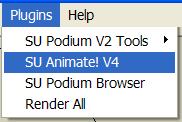
SU Animate V4 installs a single item in Google SketchUp's Plugins menu:
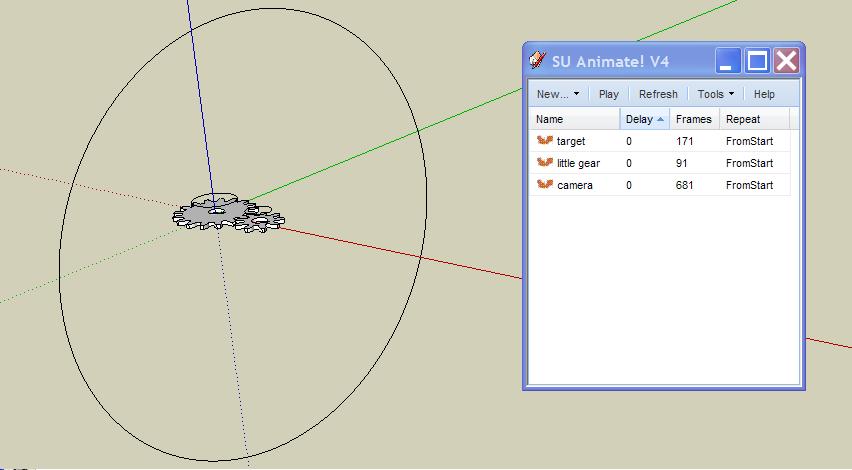
Click on SU Animate! V4 to open the main animation dialog:
Use this dialog to create, play and modify your animations.
Main Animation Dialog
The main animation dialog lists all of the animations in the current model, and provides a four-button tool bar:
New...
A submenu opens with various options for creating new animations.
Play
Opens the SU Animate Player dialog, and begins playing all animations.
Refresh
Refreshes the list of animations. Use when undo
or redo may have affected animation data.
Tools...
A submenu presents tools provided by SU Animate.
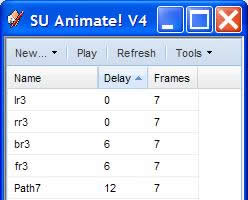
The list of all animations shows the name, the delay, number of frames, and repeat flag.
Double-click to change any of these values directly in the main animation dialog.
You can sort the list by any of the value columns, using the small arrow that appears
to the right of the text when you mouse over the header field. By default, the list
is sorted by the value of the Delay column.
Name
SU Animate generates a unique default name whenever you create
a new animation. You can change it by double-clicking the name
in the main animation dialog.
Delay
You can specify a number of frames to delay each animation with
respect to the others. When you run all of the animations in the model, each begins after
the number of frames in its Delay value. This lets you put animations into a sequence.
The bookcase model shows how delay is used.
Frames
The number of frames in this animation. For table-driven
animations, this is the number of points in the file the last time it was read, and changing
this value has no effect. For all other animation types, you can directly change the value
in this dialog.
Repeat
Check the repeat box to cause the selected animation to repeat
when played with an animation that has more frames.
There is also an SU Animate! V4tool bar
Playing Animations
Once you create an animation with SU Animate V4, you can play it using the included Player. Click Play
in the SU Animate V4 dialog to bring up the Player dialog.
Playing an animation with the SU Animate Player simply moves the objects and/or camera as you specified when
you created the animation. When you dismiss the Player dialog, it automatically undoes any changes to objects or the camera.
You can Play and Pause the animation, or Stop, which sets the animation back to its original state. You can
Step frame-by frame through the animation, or click Loop to cause the Player to continuously repeat the animation.
The Player dialog also allows you to adjust playback speed, either by using the slider or clicking on the Faster
and Slower buttons.
Playing All Animations
When you select Play from the tool bar in the main animation dialog, all animations in the model
are played together. You can adjust the Delay value in the main animation dialog to sequence animations.
This example sequences a lot of small path animations to show the assembly of a bookcase:
Playing Individual Animations
When you select Play by right-clicking on a named animation in the main animation dialog, the same
Player dialog is displayed, but in this case only the selected animation is played. It is played at once,
regardless of its Delay value. Use this feature to fine-tune a sequence of animations.
Before you start creating the keyframe or path animation, make sure that there are no existing scenes in your SketchUp model.
A key frame animation the simplest way to create an camera or object animation. It is new to SU Animate 4. It is simply a sequence of "snapshots" of your model.
The position of the selected groups and component instances in the model, the camera orientation, and the visibility of all layers
is captured with each snapshot. You can move and/or rotate objects, or pan, zoom and tilt the camera, and turn
layers on and off between frames.
Before capturing frame information, you must select any objects (groups and component instances) that you want to
animate. You can make the selection before invoking the Key Frame Animation dialog, or by using the Add/Remove Objects
button on that dialog.
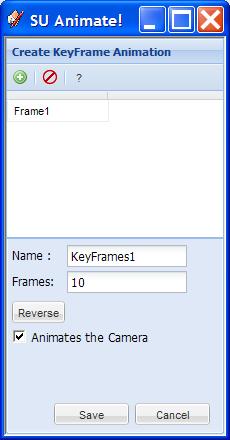
Click the "Capture" button to capture a frame. The frames you capture are the key frames. If you specify more
frames in the Frames input box than the number of key frames you create,
then SU Animate will insert additional frames, smoothing out the motions of objects and camera.
Key frame - create camera animation easily
This video tutorial shows how to create a simple camera animation with key frames. The camera animation is edited as well.
You learned how quickly you can create walk thrus with SU Animate key frames. Now take the SketchUp model to SU Walk to create photo-realistic walk thrus very quickly.
This video tutorial shows how to create a key-frame animation of a door opening and closing. Only two key frames are
created, but the motion seems smooth because SU Animate interpolated additional frames.
Key frame - animating layers to create construction time line simulations:step by step
This video tutorial shows how to create 4D simulation or the step by step construction of a building by animating the visibility of layers. Go to the next video to see how quickly the Layer Animation tool creates time lines. Also, please look at the New Tools section to see how to create layers from Groups. New Tools for SU Animate 4
Layer animation tool - automate what we just did to obtain instant time line simulations
This video tutorial shows a faster way to create layer animations to obtain 4D simulation. Also, please look at the New Tools section to see how to create layers from Groups. New Tools for SU Animate 4
Key frame - building a camera animation with key frames and combining
This video tutorial shows how to create a camera animation based on key frames and then add it to an existing key frame and combining the two key frame animations.
This tutorial shows how to easily create an assembly animation in which the components appear to fly into place. There is no narration on this video tutorial. The video shows the finished assembly. Please read how to create this assembly here.
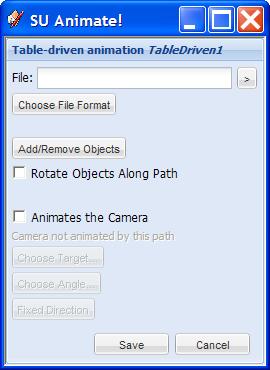
Table Driven Animations - use Excel to drive your animation
A table-driven animation moves objects or the SketchUp camera along a path defined by a table of point data.
Begin by selecting the file that contains the point data. The contents of the file will be interpreted
according to format options that you can specify using the Choose File Format button. For example,
the points can be interpreted as X,Y,Z points in the model coordinate space, or latitude, longitude, and
elevation geographic coordinates (see Window -> Model Info -> Location). The points can be full 3D points,
or 2D points, where Z or elevation is assumed to be 0.
The file date stamp is checked every time the animation is selected for playing, and the file is read if
the date stamp has changed. If the file is being continuously updated from an external application, all
you have to do is cancel and restart the player to pick up the latest data from the file.
Though the main animation dialog lets you set the number of frames for a table-driven animation,
that setting is ignored. The number of frames in a table-driven animation is always the number of
valid points read from the file.
Path Animation remains one of the easiest and flexible ways to create object and camera animations. Path animations allow you to create precise paths using polyline, line, circle/arc, spiral entities in SketchUp.
Path Animation technique was the only way to create animations when SU Animate was first released. Path Animation features have evolved to allow for complex animations for both camera and objects. SU Animate 4 adds some new features and has a completely new user interface, greatly simplifying workflow for path animations. Although the user interface has changed, many of the methods of creating paths have not changed from past versions so the SU Animate 3.2 video tutorials and help web page is still valid.
A path animation moves objects and/or the camera along a path (curve). The main animation
dialog presents three options for creating path animations: Polyline, Arc/Circle or Spiral. When you chose
one of these options, a tool activates to create the path geometry. The path creation tools are similar to
the Google SketchUp tools you already use to create lines, circles and so forth.
You can also access these Path tools from the SU Animate tool bar. (See Tool bar section below)
Add/ Remove for Object Animation with Paths
The term object animation referred to frequently means the animation of groups and components so that they appear to be moving or being animated. An example would be a fork lift backing out of a shipping container. The term camera animation refers to the movement of the SketchUp camera such as walking through a building. You can combine camera and object animations easily with SU Animate various path animations as seen below.
Requirements for Object Animation using Paths
One or more groups or components must be selected to animate objects.
New - group or component does not need a name.
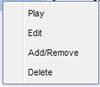
New - Add/Remove. New to SU Animate 4 is the Add/Remove selection for object animation. After creating path animation, right click on the animation name from the SU Animate 4 dialog. Click Add/ Remove and then select (click or Shift-Click) the group(s) or component(s) to be animated. The groups you select need to be highlighted in the selection. We think this is simpler than previous version which required you to name a group or component before it could be selected. You can select the group or the groups from SketchUp's outliner as well. Again, you will need to hold down the Shift key to select more than one group or component from Outliner. To de-select (remove the group from the animation path), hold the Shift key down and then de-select the groups or components.
First create the animation path(s)
Then select the animation path from the SU Animate 4 dialog. Right click and see the Add/ Remove option.
Now select the group(s) or component(s) in SketchUp and click OK. You can use SketchUp outliner as well. Use the SketchUp selection method to select groups or components with the Shift key.
There are new features to create Camera animations with paths in SU Animate 4.
Why? You may be wondering why bother with paths when you can create camera animations so easily with key frames. That is an important point because it's much easier to use key frames. However, with paths, you can create very precise camera animations that move along a polyline, circle, arc or spiral path. You can also target your camera to focus on a moving or still group. You can specify what angle you want your camera to be facing.
Requirements for Camera Animation using Paths
Create a path - polyline, circle/arc, spiral or convert an existing curve into a path.
Rotate Objects Along a Path
If you are creating an object animation (groups or components), choose whether or not to Rotate Objects Along a Path. When this is on, the object (group or component will rotate with the rotation angle of the path. In many cases, you will prefer not to rotate the object. View this video to see the difference.
New - pick Animates the Camera for Camera Animations (only)
For Camera Animations - Pick one or more of the three options: Choose Target, Choose Angle, Fixed Direction
Please read more about these three options in the SU Animate path web page, as the function of these options have not changed.
The Polyline Path Tool works like the Line Tool, but adds an arc between successive segments.
You control the radius of the arc through the Corner offset item in the tool's context (right-click) menu.
You have to use the context menu's Done option to complete the path creation and move on to the
animation properties dialog.
Use the context menu's Undo last option to undo point selections while creating a polyline path.
Once the path is created, SU Animate! adds an Edit polyline option to the context menu when a
single polyline is selected.
Arc/Circle Path Tool
The Arc/Circle Path Tool is somewhat similar to the Circle Tool, but adds a context menu with
options to create an arc instead of a full circle, and to control the plane of creation.
Begin by choosing a center point. You can then specify the radius, either by dragging or by simply
typing a numeric value, or you can access other options in the tool's context (right-click) menu.
The context menu lets you choose an Arc start point. When you do so, the cursor changes to drag
an arc in the one direction from the selected point. The updated context menu then presents an option
to Reverse arc direction. Clicking another point to define the arc end point completes the
arc definition and opens the animation properties dialog.
The context menu also presents the option to choose a Point on axis. The point will be used
with the center point to define the normal vector of the circle - that is, the line that the circle
will go around. After specifying the point, the tool reverts to its original function, but the
display will show the arc/circle on the new plane.
SU Animate! adds arc editing options to the context menu whenever an arc/circle is selected
whether or not the arc/circle was created with SU Animate!. The options are Change Radius
and Move by Center.
Spiral Path Tool
The Spiral Path Tool is somewhat similar to the Circle Tool, but adds a dialog to
let you specify the height and number of turns. The context menu also presents the
Point on axis option, exactly like the Arc/Circle Path Tool.
Please see this section of the SU Animate 3.2 web page to see the video tutorial on Spiral Path Tools.
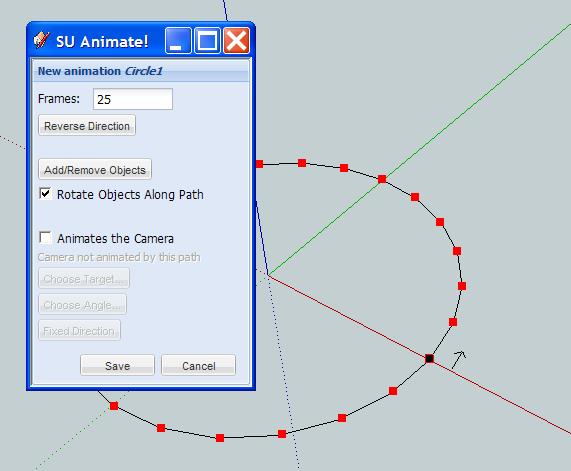
When you are done defining the path, SU Animate will show how it has placed points on the path,
then displays the Edit Path Animation dialog to let you select animated entities
and specify properties of the animation:
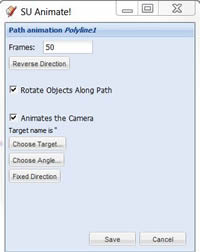
The points are indicated using orange squares, each of which represents a frame in
the animation. A black inset square indicates the first point, and a small arrow indicates
the direction of the path. The dialog box lets you change the number of points (Frames)
or Reverse the direction of the path.
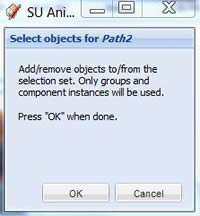
To select the objects that will be animated along this path, press the Add/Remove Objects button.
This will open a dialog prompting you to select the desired items. Note that only groups and
component instances can be animated. Other items in the selection will be ignored. You may choose
not to select any objects to animate, if this is to be a camera animation.
When the animation is run, SU Animate will move the selected objects from one point to the next,
also rotating them according to how the angle between segments changes along the path.
Clear the Rotate Objects Along Path check box to specify that the objects be moved
without also being rotated. Rotate Objects Along Path is new to SU Animate 4.
If you check the Animates the Camera check box, the the animation will animate the camera
along the path. You can choose this option whether or not you have selected any entities to be
animated. You then have several ways to specify where the camera will point as it moves
along the path:
target - the camera will remain pointed at a selected group or component -- even if that object is itself animated.
angle - the camera will point along the path, or at a specified angle away from the path
fixed - the camera will remain pointed in the direction that it is in when you play the animation
Path Animation From Existing Curve(s)
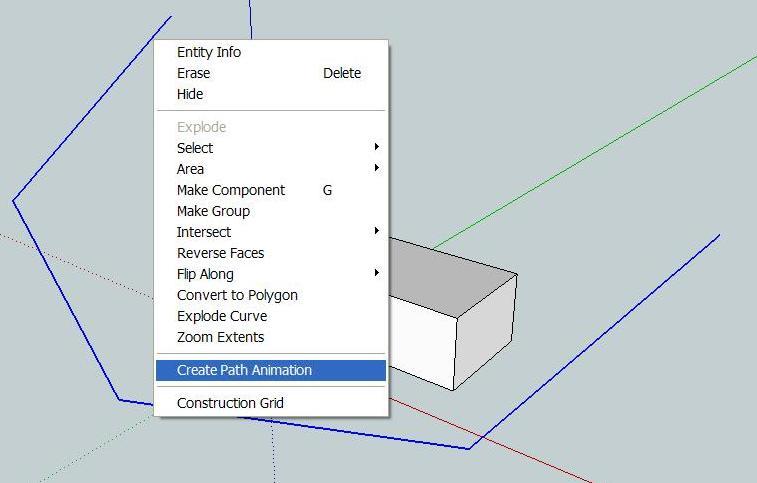
There is another way to create path animations using existing curves. When an edge or connected set of edges
is selected, SU Animate! extends the Google SketchUp context menu with an option to Create Path Animation:
Selecting this option creates a single path from the selected edges, and creates animation points for
each vertex of the path. The same animation editor dialog box opens that the other types of
path animations use, so that you can select entities to animate and adjust animation properties.
You can nest path animations inside other path animations to simulate compound motions
like a wheel rolling on a moving car. To do so, simply make a group of the "inner" animated object
and its path, then add that group to the "outer" animation.
For example, suppose you have a car model with separate wheel components, animated along a path.
To simulate the rolling of the wheels, each wheel component would need to be animated with an
arc/circle path animation. Next, make separate groups of each wheel/circle pair. Finally, add the
new groups to the path animation that simulates the car's motion. When you refresh the dialog,
the wheel animations will appear in square brackets to indicate that they are contained within
the path animation. When you run the animation, the wheel components will appear to roll with
the motion of the car. You may need to adjust the direction and number of frames of the wheel
animations to make the relative motions more lifelike.
Nested Path Animations is described in detail on the SU Animate Nested Help section. Nested animation features have not changed since 3.2 so the help section is valid. Please click here. There are also video tutorials describing nested animation. The videos were created using SU Animate 3 so the UI is older but the method of creating nested animations has not changed.
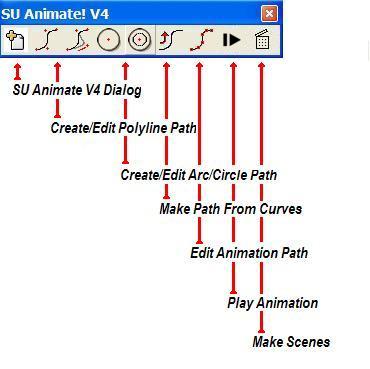
Tool bar and Context Menus
The SU Animate! V4 Tool bar provides instant access to the operations you will
use most often in creating and running animations. The following figure identifies the operation
of each button:
SU Animate! V4 provides Context Menus in various situations. The context menus
of the animation tools are described in the sections that document the tools. SU Animate!
also adds items to the context menu when specific items are selected:
Single arc or circle - Adds options Change Radius and Move by Center.
Single polyline path - Adds option to Edit Polyline.
Animation path - Adds option to Change Animation Parameters.
Connected set of edges - Adds option to Create Path Animation.
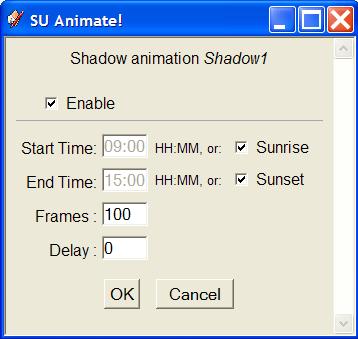
A shadow or time lapse animation animates shadows simulating a time lapse. It is the simplest animation to define. Just fill in the values
in the Shadow dialog, specifying what part of the day you want to simulate, and how many frames to use.
SU animate will compute the time of day for each frame, and Google SketchUp will calculate shadows based on the
time of day and the geographic information (location and time of year) specified in the model properties.
If shadows are not displayed in Google SketchUp (Window -> Shadows -> Display shadows) when a shadow animation
is played, they will be enabled automatically. To disable this feature without deleting the shadow animation,
clear the dialog's Enable check box.
Any body with previous version of SU Animate knows the great utility called SU Grid that comes with SU Animate. Naturally, this is still in SU Animate 4 and a convenient way to place a path in a complex model.
There are several new tools with SU Animate. The main SU Animate! V4 dialog presents a menu of Tools to help you create and use animations.
The Name all groups/components tool assigns a unique name to each unnamed group or component
instance in the model. The name is a base string plus a string to make the name unique. The base
string is "Group" for a group, or the name of the component definition for a component instance.
The tool does not descend into groups/components contained within other groups/components.
Upon completion, the tool reports any changes in a message box.
This tool can help when you want to identify groups/components by name, for example in specifying
the camera target in a camera animation, or in distributing groups/components to layers.
Distribute groups/components to layers
The Distribute groups/components to layers tool assigns named groups or component instances
that are on the default layer ("Layer0") to a layer based on the name of the group/component.
The layer name is the group name, or in the case of an unnamed component instance,
the component definition name. The layer is created if it does not already exist.
Objects with the same name, or instances of the same component definition,
can end up on the same layer. The tool does not descend into groups/components contained within other groups/components.
Upon completion, the tool reports any changes in a message box.
This tool is particularly helpful in creating key-frame animations in which you want to manipulate
the visibility of objects by turning layers on and off.
Please take a look at the key frame video tutorials.
EditInPlace
EditInPlace is a SketchUp context menu item that is available when you select a group or component. EditInPlace is not specific to SU Animate but is a general SketchUp utility from Cadalog, Inc. It allows you to open a selected SketchUp group and edit in a different SketchUp sessions, saving you a lot of headache. It is very useful when you are using large models with many groups or components. Read more about it here. It comes free with SU Animate.
SU Grid or Construction Grid
SU Grid or construction grid is a context menu item. Select a face in SketchUp and right click to open the context menu. You will notice an option called Construction Grid. Choose Construction Grid to create a grid of lines on a face or a grid in a specific coordinate. The grid can be used to draw lines, arcs and circles and snap to end points or intersections of the grid lines. The grid itself is it's own group and on it's own layer and can be deleted or hidden.
The final step - Make Scenes
Make Scenes
The final step to creating an animation in SketchUp is to Make Scenes. SU Animate's power is to automatically create SketchUp scenes and layers for each animation. For object animations, the program will create a layer for each scene and hide all layers except for the one being "played". The number of scenes will equal the total number of frames in all the animation paths.
Play the Animation in SketchUp
After Make Scenes is completed, it's time to play the animation using SketchUp's View-->Animation-->Play command. Make sure that the Animation Settings in SketchUp is what you want. Usually the faster the transition speed, the better. You can then export the Animation to an AVI or a MOV file using SketchUp's Animation Export command.